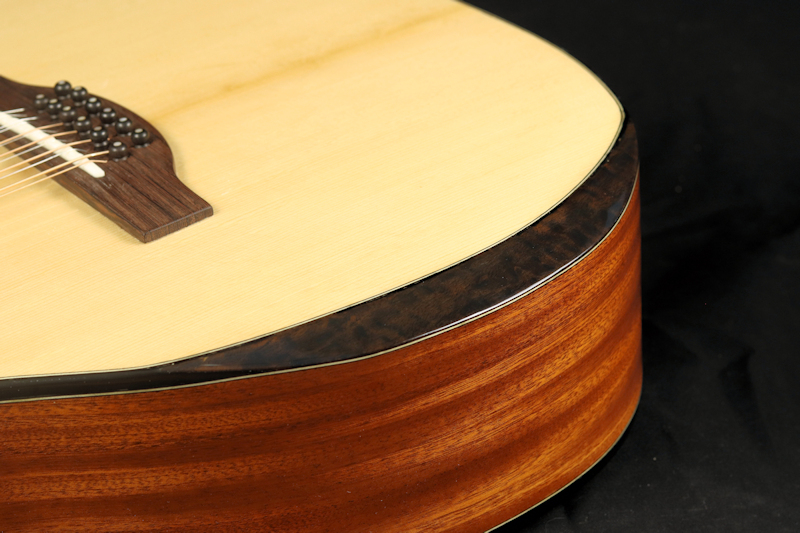
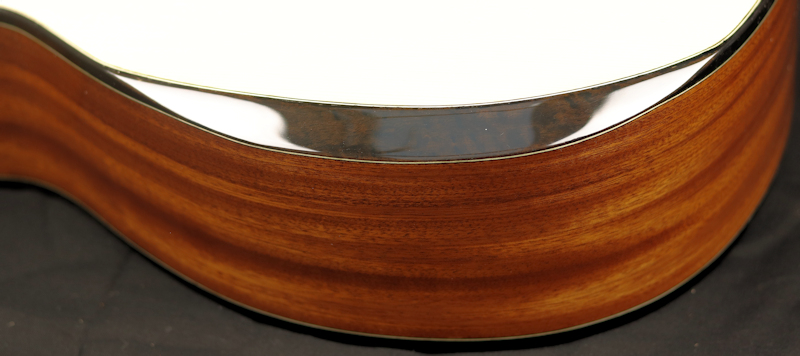
Making an armbevel did scare me off till now. The difficulty is how to make it neat and flawless.
So for the first time to do this, I made an experimental guitar, not for a customer. But it turns out quite nice.
Spruce/Sapele/Maple/Mahogany and Ebony. Home made Full-Round Rosette/Armbevel/Soundports and a Florentine cutaway.
For more details, specs and pictures look Here
Finally I recorded some Sounds
But the Armbevel is something you might like to see here, so:
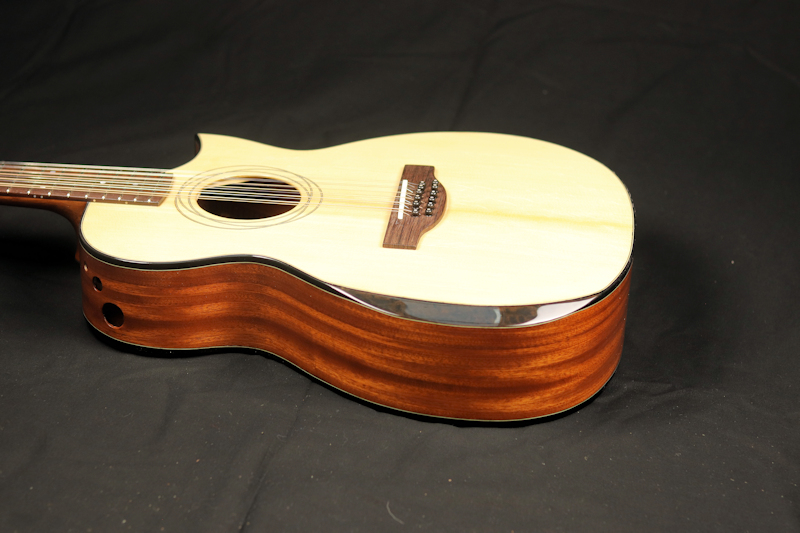
OM 12 string, armbevel, cutaway, soundports. Now with sound
Last edited by Herman on Mon Apr 25, 2022 8:54 am, edited 1 time in total.
-
- Posts: 2755
- Joined: Fri Dec 23, 2011 8:33 pm
- Location: Seattle
- Contact:
Re: OM 12 string, armbevel, cutaway, soundports
Wow, A stunning instrument Full-Round Rosette/Armbevel/Soundports and a Florentine cutaway and a 12 string. Every detail looks great. Air bevels are hard. You did a great job blending the arm bevel wood with the bindings. The clean line looks less like a joint than a change in reflection. How did you keep the WHITE purfling lines continuous. I have done a couple like Everett teaches, using soft wood inside and veneer on the outside. His transition thins the binding with the purfling as it enters the arm bevel area and it is forced to follow the transition. It does not look like that is how you did it.
Re: OM 12 string, armbevel, cutaway, soundports
Yes John, the purfings are made of one continuous piece.
The hardest parts are the routing of the purfling into the sides and making the transitions of the veneer to the binding for blending in. I took ebony and a dark colored veneer for that. The black makes it easier to touch up flaws (It is very easy to sand too deep, and make the underlaying wood visable).
I wouldn't do this with maple, too tricky.
It would take a lot of lines to discribe how I did it, but if you watch this vids, it explains quite the procedure I followed:
-
- Posts: 2755
- Joined: Fri Dec 23, 2011 8:33 pm
- Location: Seattle
- Contact:
Re: OM 12 string, armbevel, cutaway, soundports
Thank You! That is a lot like I did it with a few changes. He routes a purfling channel, I precut the top and side before I glued on the plates. I installed the top purfling on the top edge using pins to hold it in place while the glue dries. As I mentioned above the Carlos Everett method had him using bindings with pre glued purfling strips. He narrowed the binding quite a bit so that he could he could install it by bending it to follow the side ledge. Then the inside block was shaped to the binding and or purfling lines. After that it was pretty much the same with the veneer.
I did learn the hard way that it is easy to make the underlying wood show sanding the top. Because of the angle the veneer is easy to sand through if the top is sanded. I learned to make sure the top and the top purfling are as close to finish preped as possible. Then the bevel veneer can be leveled to the top with edge tools. The idle is that there is no need to sand the top and the top purfling line after that.
It was a revelation to see the side purfling done that way. I always feared bending the purfling sideways into the channel. I heard that it was done but my mind could not accept it.
So I like this method: Creating the bevel after the instrument was closed, Creating top purfling channel and a side ledge, and the handy sanding jig with the purfling angle (I tended to have issues rounding me bevel.)
Again thanks for posting
-
- Posts: 105
- Joined: Mon Jul 04, 2016 6:32 pm
- Location: Petaluma, Calif.
Re: OM 12 string, armbevel, cutaway, soundports
Beautiful work, Herman. Gorgeous.
I build guitar bodies with a wedge (Manzer wedge) because I don't have the combination of courage and skill to do an arm bevel. You do. Well done.
I've evolved my building in an attempt to avoid all activities that require skill. I use a zero fret so that I don't have to carve a nut. I use an adjustable, bolt-on neck so that accurately constructing the neck angle isn't required. I glue up laminate sides (in a press I built using a CNC router) so that I don't have to heat-bend. I use wipe-on finishes so that I don't have to spray and avoid hide glue so that I have plenty of time to set up and clamp. I cut my fretboard slots, headblock mortice, soundhole, and rosette channels with a CNC router. I carve my bridges and rough out my necks the same way. No skill required. And I don't attempt an arm bevel.
Kudos to you, Herman. Beautiful work.
-
- Posts: 5952
- Joined: Tue Dec 13, 2011 7:44 pm
Re: OM 12 string, armbevel, cutaway, soundports
Yep, beautiful work, Herman!
H - don't read the rest of this post, as I am hijacking a bit. I know this is about your guitar but I wanted to respond to Hans.
Hans - I have much the same type of practice you set forth. The interesting thing is - though they don't demand as much 'skill' - the results sound and look just as good as the 'professional' practices. In fact a case can be made that laminated sides are a step above solid sides as to strength and transmission. Opinion. A bolt-on neck is just as good as a dovetail. Opinion. A wipe-on finish is not a 'beginners' finish - it is attractive and protective. Opinion. Titebond works as well as an adhesive as HHG (though there are differences in setup time etc.). Opinion.
-Under permanent construction
Re: OM 12 string, armbevel, cutaway, soundports
Thank you, my friends. Too much Kudos. Just doing what I can, as all of us are doing.
You are right John about the side purfling troubles.
Here I used self made black/white purfling from wooden strips.
The trouble with that wood purfling is, that it bends easily in one direction, but almost not to the "cross"-direction. I did it anyway for the side strips, but that purfling did split and warped on several spots.
With a lot of heat, CA-glue and a lot of pins I was able to glue it flat into the side slot. Not funny!
So my hard lesson here: use plastic purfling for the side. It bends easier in two directions.