Portable Spray booth
Posted: Thu Jan 05, 2012 7:47 pm
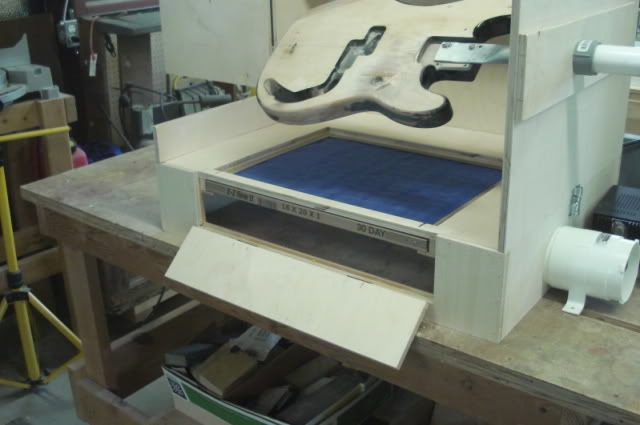
Here's a table top spray booth designed by a friend of mine with a few mods I have added to fit my needs. The booth uses an 4 inch explosion proof 12V bilge Blower from a boat application. The pressure is good enough and the system efficient enough to shoot lacquer w/o a respirator (I still wear one just for safety's sake) but the point is that the fumes and over spray are immediately reduced to a near zero level with the 4" blower @ 240 CFM's. The size can be changed to meet your needs but I have found that as it is is perfect for me. Except that the pics shown are left handed and mine is right handed and I am currently setting up a new shop and don't have mine set up yet , but the only difference is the guitar is supported from the left side so I can spray with my right hand.
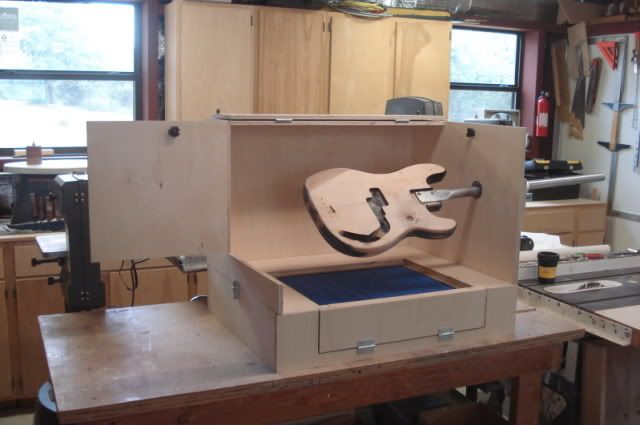
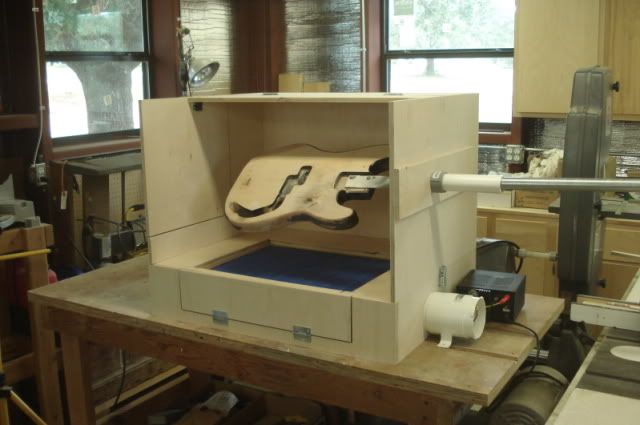
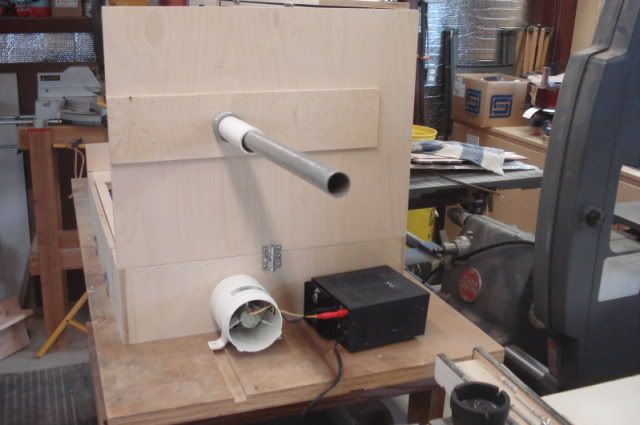
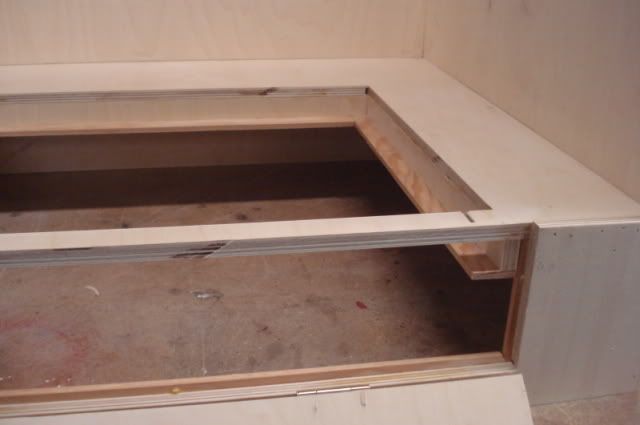
The filter mounting is just some scrap ply that is ripped to the height of the filter,
mounted on the around the opening cut in the top of the lower box. The pieces are glued
and nailed to the top of the lower box. Cut and glue some flat moulding to the ply as
shown. This allows the filter to slide into the opening and held in place by the hinged
front flap. shown below.
I drilled hole to mount a 1 ¼” PVC male adapter and nut, with a piece of 1 ¼” PVC pipe
extension. The pole is a piece of 1” EMT conduit smashed on the end and drilled to
mount the body with screws and nuts. The blower is a Detmar 751 marine grade 4”,
12VDC blower rated a 240 CFMs and 3.5 amp. I use a 12VDC power supply rated at 7
amps, but might find one a little smaller that will work. Both the blower and power
supply were found on Ebay.
The vent is 4” dryer vent tubing, mounted to the blower and a outside dryer vent. The
vent and hose can be bought at any hardware store. Vent is similar to this. I have it
mounted to piece of ½”ply, put into the groove of an open window, pulled the window
down on top of the ply. Pretty sturdy and weatherproof.
As far as cost is concerned this booth was built with one sheet of 1/2 Birch plywood $35 here.
One 4" bilge blower @ $24.08
One used 110 V to 12 V DC 10 amp converter $12 (like the one seen behind blower in the pic above.
The unit used a $1.28 replaceable furnace filter.
The hinges, slide locks and pipe fittings cost me $17
The dryer hose and exit fixture mounted on a piece of plywood to set in the window $23
Withe a total cost of $112.23 The price may vary where you live or depending on what you may have hanging around in your shop.
I LOVE my booth. it gives me a great safe environment inside, regardless of the weather. It takes up little room. It can be closed up with the body or neck inside to protect it from dust or? until it cures. It's a stable way to hold the instrument, easy to turn. A change of filter is cheap and simple and there is little or no debris outside.
For a cost of around a $100 it's a hard to beat, safe and reliable spray booth that solves a lot of problems associated with spraying paint of any kind.
I have adequate overhead lighting so a light on the booth isn't needed. It one should want to add a light then it would be necessary to be sure it's an explosion proof system.
Here are some dimensions to give you an idea of the size. all of which are optional depending on your needs.
The entire booth is 24inches high and 30 inches wide.
The "Base" portion is 6 inches high and 30 inches wide.
The "Top" section is 30 inches wide and 18 inches high.
The booth is 18 inches deep
The open "Side" door is 15 inches square.
The opening t door is 30 inches wide by 15 inches deep
The filter door is 20 3/4 inches by 4 1/2 inches high
The top section is setting on the bottom section and is held in place b three latches, one in the back and one on each side.
The filter opening under the guitar is 19 1/2 inches wide by 14 3/4 inches deep
if you need more info or a better visual, PM me with your E-mail and i will forward you a PDF file that I can't seem to add here.
I hope this gives you some better ideas about ways to handle what can be a very frustrating portion of what we do.
Ray :)


The filter mounting is just some scrap ply that is ripped to the height of the filter,
mounted on the around the opening cut in the top of the lower box. The pieces are glued
and nailed to the top of the lower box. Cut and glue some flat moulding to the ply as
shown. This allows the filter to slide into the opening and held in place by the hinged
front flap. shown below.

I drilled hole to mount a 1 ¼” PVC male adapter and nut, with a piece of 1 ¼” PVC pipe
extension. The pole is a piece of 1” EMT conduit smashed on the end and drilled to
mount the body with screws and nuts. The blower is a Detmar 751 marine grade 4”,
12VDC blower rated a 240 CFMs and 3.5 amp. I use a 12VDC power supply rated at 7
amps, but might find one a little smaller that will work. Both the blower and power
supply were found on Ebay.
The vent is 4” dryer vent tubing, mounted to the blower and a outside dryer vent. The
vent and hose can be bought at any hardware store. Vent is similar to this. I have it
mounted to piece of ½”ply, put into the groove of an open window, pulled the window
down on top of the ply. Pretty sturdy and weatherproof.

As far as cost is concerned this booth was built with one sheet of 1/2 Birch plywood $35 here.
One 4" bilge blower @ $24.08
One used 110 V to 12 V DC 10 amp converter $12 (like the one seen behind blower in the pic above.
The unit used a $1.28 replaceable furnace filter.
The hinges, slide locks and pipe fittings cost me $17
The dryer hose and exit fixture mounted on a piece of plywood to set in the window $23
Withe a total cost of $112.23 The price may vary where you live or depending on what you may have hanging around in your shop.
I LOVE my booth. it gives me a great safe environment inside, regardless of the weather. It takes up little room. It can be closed up with the body or neck inside to protect it from dust or? until it cures. It's a stable way to hold the instrument, easy to turn. A change of filter is cheap and simple and there is little or no debris outside.
For a cost of around a $100 it's a hard to beat, safe and reliable spray booth that solves a lot of problems associated with spraying paint of any kind.
I have adequate overhead lighting so a light on the booth isn't needed. It one should want to add a light then it would be necessary to be sure it's an explosion proof system.
Here are some dimensions to give you an idea of the size. all of which are optional depending on your needs.
The entire booth is 24inches high and 30 inches wide.
The "Base" portion is 6 inches high and 30 inches wide.
The "Top" section is 30 inches wide and 18 inches high.
The booth is 18 inches deep
The open "Side" door is 15 inches square.
The opening t door is 30 inches wide by 15 inches deep
The filter door is 20 3/4 inches by 4 1/2 inches high
The top section is setting on the bottom section and is held in place b three latches, one in the back and one on each side.
The filter opening under the guitar is 19 1/2 inches wide by 14 3/4 inches deep
if you need more info or a better visual, PM me with your E-mail and i will forward you a PDF file that I can't seem to add here.
I hope this gives you some better ideas about ways to handle what can be a very frustrating portion of what we do.
Ray :)