
Yes , that happens.
Luckily my parcel was delevered next door indeed. In the evening I finally got my bone pieces. Good neighbors.
Square neck Resonator/Dobro lap guitar
-
Kenny Wiebusch
- Posts: 135
- Joined: Wed Mar 06, 2019 11:39 pm
- Location: Southeast Texas
Re: Square neck Resonator/Dobro lap guitar
I retired four years ago. I had worked repairing copiers for Xerox for 40 years. I highly suggest retirement! Congratulations Herman! I have played around on some square neck. It is quite fun and a lot to learn.
Re: Square neck Resonator/Dobro lap guitar
Thanks Kenny.
In the mean time I bought the book "Making a resonator guitar - Gary Brenchley" from amazon.
It is a resource for finding mesurements, because I don't have such a plan.
But I've seen better books. The layout is very plain, with text and drawings. No photo's. A lot is about making jigs and templates, but less about building techniques. For example, the headplate slots are shown in a drawing, where they have to be routed. But no detailed explanation how to do that. The same with the neck fitting/allignment/neckangle).
Therefore, it is a book for those who know how things have to be adressed, but certainly not for a first timer.
But hey, for 17 euro you cannot have everything
Herman
-
Kenny Wiebusch
- Posts: 135
- Joined: Wed Mar 06, 2019 11:39 pm
- Location: Southeast Texas
Re: Square neck Resonator/Dobro lap guitar
Something to aspire to! Mr. Benoit lived about 25 miles from me. I recently bought wood and binding from his estate. He was a master at this craft.
https://reverb.com/item/80749788-benoit ... ssar-ebony
https://reverb.com/item/80749788-benoit ... ssar-ebony
Re: Square neck Resonator/Dobro lap guitar
Thank Kenny, nice link.
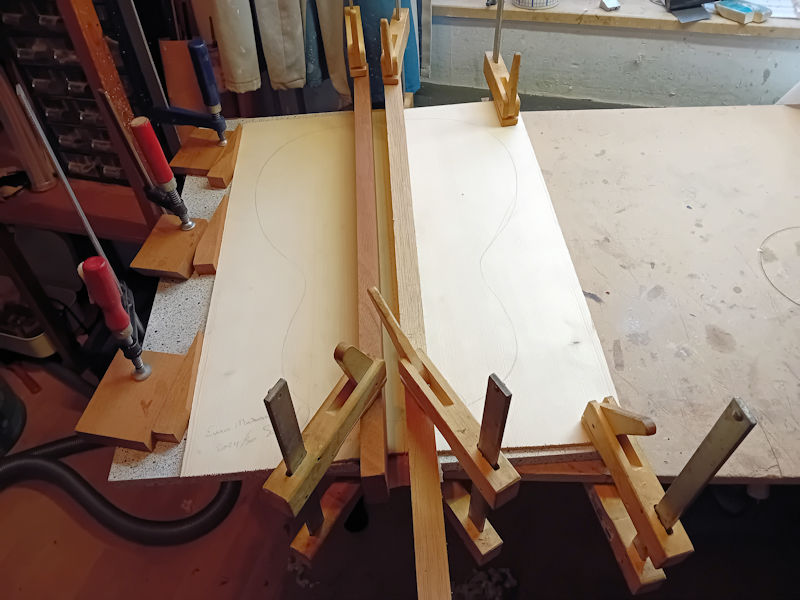
Leads me to the thought of flipping my sides (look at first picture above) and place the cutaway toward the player!
Have to reshape my neck block though, but really a thing to consider.
Leads me to the thought of flipping my sides (look at first picture above) and place the cutaway toward the player!
Have to reshape my neck block though, but really a thing to consider.
Re: Square neck Resonator/Dobro lap guitar
Finally I got the B grade top. It is as expected. Not that beautiful, but not ugly either. It is light and has a Sound Radiation Coëfficiënt of 15! (=high), but the downside is that it is very flexible.
So I will leave it at a 0.15" final thick. It has to bear high tension strings, tuned to GBDGBD (=tough).
Jointing the top is nothing special. Planed and glued in my usual way.
(BTW: I use some super flat bookshelf panels while glueing, 'cause my workboard is crooked )
)
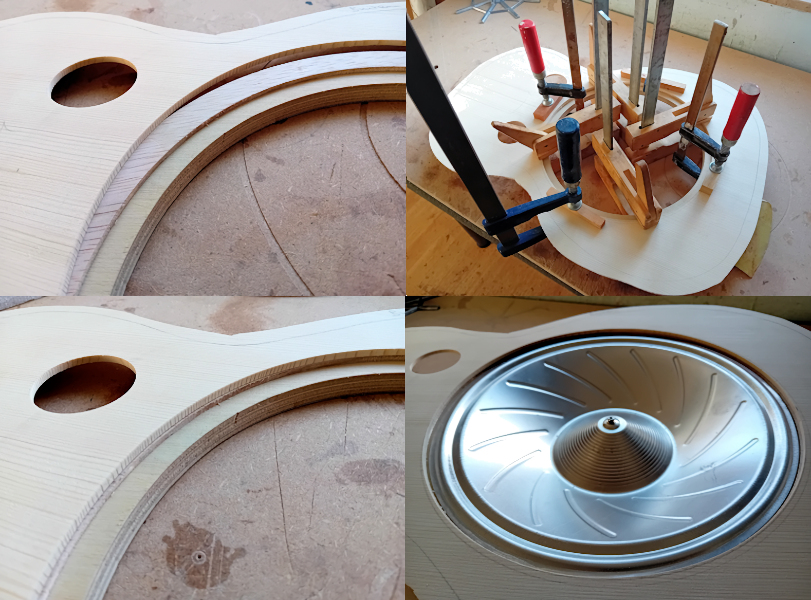
Regular dobro's have an open drum for the resonator cone to rest on. I use a different way. I made a solid ring, that will be glued to the top. When the guitar is ready, I will make some soundposts with one side to that ring and the other side of the posts will rest on the back braces. Here I made the ring form two pieces of plywood. (3/8" and 1/8"). On the lower piece in the pic the cone will rest. The upper part is glued to the top, routed 1/8" wider than the cone (for intonation reasons) and it allows the cone to sit a bit deeper in the top, so it cannot touch the coverplate.

So I will leave it at a 0.15" final thick. It has to bear high tension strings, tuned to GBDGBD (=tough).
Jointing the top is nothing special. Planed and glued in my usual way.
(BTW: I use some super flat bookshelf panels while glueing, 'cause my workboard is crooked
Regular dobro's have an open drum for the resonator cone to rest on. I use a different way. I made a solid ring, that will be glued to the top. When the guitar is ready, I will make some soundposts with one side to that ring and the other side of the posts will rest on the back braces. Here I made the ring form two pieces of plywood. (3/8" and 1/8"). On the lower piece in the pic the cone will rest. The upper part is glued to the top, routed 1/8" wider than the cone (for intonation reasons) and it allows the cone to sit a bit deeper in the top, so it cannot touch the coverplate.
Last edited by Herman on Tue Feb 04, 2025 6:56 am, edited 1 time in total.
Re: Square neck Resonator/Dobro lap guitar
Ok, Top joint and thickness to 0.15"/3,5 mm. Never left a top that thick, but here I go for safe.
The resonater hole was cut with my dremel rosette cutter. But the holes for the soundports are too tiny for the jig. So I routed them out by hand and rounded the edge with sandpaper wrapped around a baby oil bottle. Seems a weird choice, but the diameter was just perfect .
.
I'm happy I did not use an expensive top, 'cause there is not much left of it.
In the next picture you find, starting from the top left:
-The build-up of the resonator hole
-Gluing the rim to the top
-After gluing
-How the resonator cone drops in
The resonater hole was cut with my dremel rosette cutter. But the holes for the soundports are too tiny for the jig. So I routed them out by hand and rounded the edge with sandpaper wrapped around a baby oil bottle. Seems a weird choice, but the diameter was just perfect
I'm happy I did not use an expensive top, 'cause there is not much left of it.
In the next picture you find, starting from the top left:
-The build-up of the resonator hole
-Gluing the rim to the top
-After gluing
-How the resonator cone drops in