Nice John. This is going to be a sweet guitar. The vacuum clamping really gets my attention. I think its pretty cool.
Probably not for me since I only do about one guitar per year, but I like the concept.
I hope you ate some good kabobs and stuffed vegetables while you were on your trip.
Kevin
Classical guitar Finished FP on body.
-
Kevin in California
- Posts: 2796
- Joined: Mon Dec 19, 2011 4:19 pm
Re: Starting # 11 a Hauser\Tored\Jeff Elliott Guitar
Looking good! I will be following closely as I am supposed to build a flamenco this winter. Since much of the construction is similar, this is going to help. Therefore, you have to meticulously document this build as though it were an instruction manual. No pressure!
Thanks!
Thanks!
-
John Parchem
- Posts: 2746
- Joined: Fri Dec 23, 2011 8:33 pm
- Location: Seattle
- Contact:
Re: Starting # 11 a Hauser\Tored\Jeff Elliott Guitar
Tony,TonyinNYC wrote:Looking good! I will be following closely as I am supposed to build a flamenco this winter. Since much of the construction is similar, this is going to help. Therefore, you have to meticulously document this build as though it were an instruction manual. No pressure!
Thanks!
Are you going to do a bolt on or a Spanish heel? Bolt-ons are becoming more and more normal in a classical guitar. If a bolt-on the steps would be very close to a steel string. The biggest difference being the bracing and the neck angle. One funny difference is that classical guitars do not have tape or braces on the rim to prevent cracks. The only explanation I got was that classical guitar players treat their instrument nicer.
Re: Starting # 11 a Hauser\Tored\Jeff Elliott Guitar
I am going to do a bolt on. The owner is not a traditionalist as far as neck joints go, but he does want wooden tuning pegs. It will be a copy of a Domingo Esteso flamenco blanca. I even found plans for the guitar. Other than the bolt on neck, it will be as close as I can get to a true copy. I admire the Spanish slipper method of doing the neck joint, but for ease of any future neck resetting, I will do a bolt on. Plus, I'm comfortable with bolt on necks.johnparchem wrote: Tony,
Are you going to do a bolt on or a Spanish heel? Bolt-ons are becoming more and more normal in a classical guitar. If a bolt-on the steps would be very close to a steel string. The biggest difference being the bracing and the neck angle. One funny difference is that classical guitars do not have tape or braces on the rim to prevent cracks. The only explanation I got was that classical guitar players treat their instrument nicer.
I was just giving you a hard time with the request for documentation. But, I do enjoy a well documented build quite a bit.
Tell me more about this neck angle stuff.
Re: Starting # 11 a Hauser\Tored\Jeff Elliott Guitar
I believe a bolt on neck with a truss rod is the way to go -- the TR allows for construction with a much thinner neck which adds to the playability of the instrument. The sticking point for a lot of Classic players is a French polish finish at least on the sound-board, no reason not to accommodate. To me its interesting how modern trends seems to be more acceptable in the classic arena -- carbon fiber, molex inner double sound boards, lattice bracing etc. all seems to be OK.
ken cierp
http://www.kennethmichaelguitars.com/
Store Front
http://www.cncguitarproducts.com/
KMG Guitar Kit Information
http://www.kennethmichaelguitars.com/ki ... ckage.html
http://www.kennethmichaelguitars.com/
Store Front
http://www.cncguitarproducts.com/
KMG Guitar Kit Information
http://www.kennethmichaelguitars.com/ki ... ckage.html
-
John Parchem
- Posts: 2746
- Joined: Fri Dec 23, 2011 8:33 pm
- Location: Seattle
- Contact:
Re: Starting # 11 a Hauser\Tored\Jeff Elliott Guitar
I agree with the bolt-on with a truss rod. I made this one a Spanish heel for two reasons, one is that I had a neck the other is I wanted to practice the skill of working with this neck. As you will see in a later post there is a lot to get right. For my future guitars I will shift to a bolt-on neck.
Tony, one suggestion for the tuning pegs is to go for planetary geared pegs. They look like ebony and weigh about the same but it sure makes tuning easier. A flamenco wants to be light so it is fast with very little sustain. Some claim the slotted tuning machines add too much weight leading to more sustain.
Tony, one suggestion for the tuning pegs is to go for planetary geared pegs. They look like ebony and weigh about the same but it sure makes tuning easier. A flamenco wants to be light so it is fast with very little sustain. Some claim the slotted tuning machines add too much weight leading to more sustain.
-
John Parchem
- Posts: 2746
- Joined: Fri Dec 23, 2011 8:33 pm
- Location: Seattle
- Contact:
Re: Starting # 11 a Hauser\Tored\Jeff Elliott Guitar
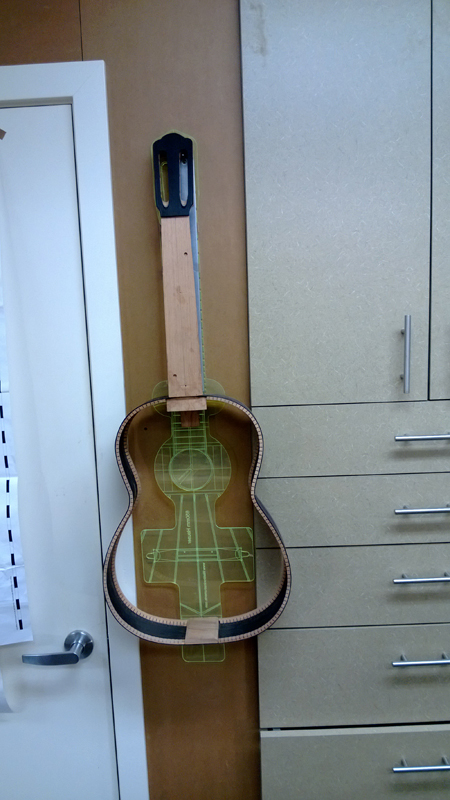
I have the neck and the rims finished including having the kerfed linings in and properly profiled. I did have one minor screw-up I will describe later in the post that I was thankfully able to fix with no damage.

A classical guitar has a different neck\body geometry than a steel string. There are 2 reasons that I can tell for this difference. The first is that a classical guitar typically has the strings lower at the saddle position than a steel string guitar (10 mm vs. 14 mm.) Also, especial on the bass side, the classical guitar has a higher nominal action than a steel string guitar. For some easy to see calculation lets pick a 6 mm thick fret board with a 3 mm desired action at the 12th fret. One needs 2 x the action at the saddle (6 mm) plus a 6 mm thick fret board plus a 1 mm fret it is easy to see that with no angle on the neck I am already too high, 13 mm instead of 10 mm. So if one was using a straight edge on the neck without the fret board the straight edge would have to go inside of the body at the saddle for the correct angle. On the SS it is about 1.5 mm above the top at the same location.
Classical guitar builders use a variety\combination of methods to create the correct geometry: tilting the neck toward the top so that the nut end of the neck is a couple of mm higher than the plane of the body, or planning the angle into the fret board; both methods are often combined with a dome only on the lower bout.
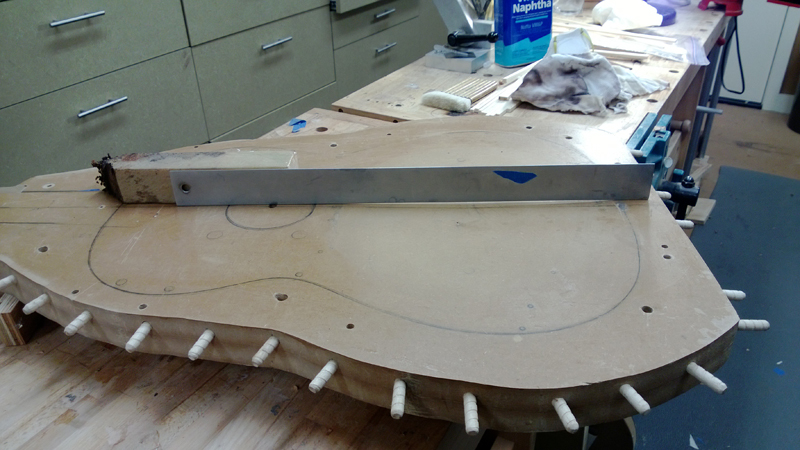
I keep the neck flat to the body and plane the desired angle into the fret board and make a dome. If you look at the picture of my solera you can see that I can use it to create the flat neck angle and the dome. Looking at the straight edge in the picture, you can see that the straight edge is in the dome with a flat neck angle.

The neck angle in a classical with a Spanish heel is not fixed\set until the back is glued on. To close the box I will make sure the is top properly indexed in to my solera, I will first glue on the neck and rims on to the top. I also have index pins in the solera for the neck so I am sure that the top and neck are properly positioned as I clamp the rims to the top. I will have the neck clamped tight against the solera through this whole process. Leaving the body on the solera I will then clamp on the back. The solera keeps everything properly aligned while closing the box.
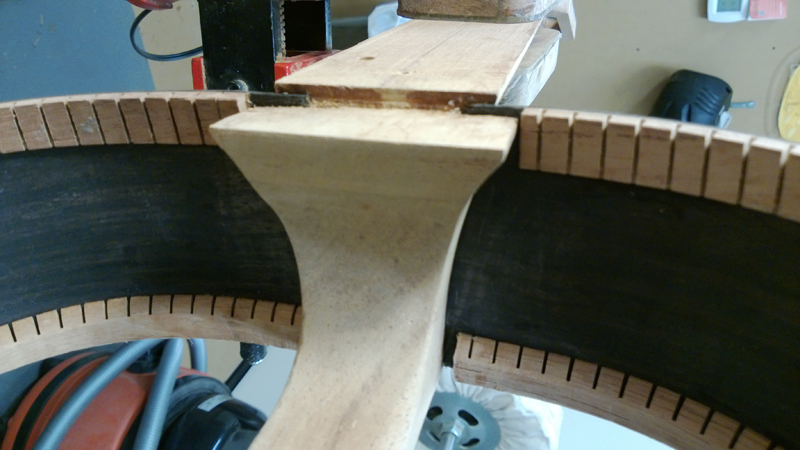
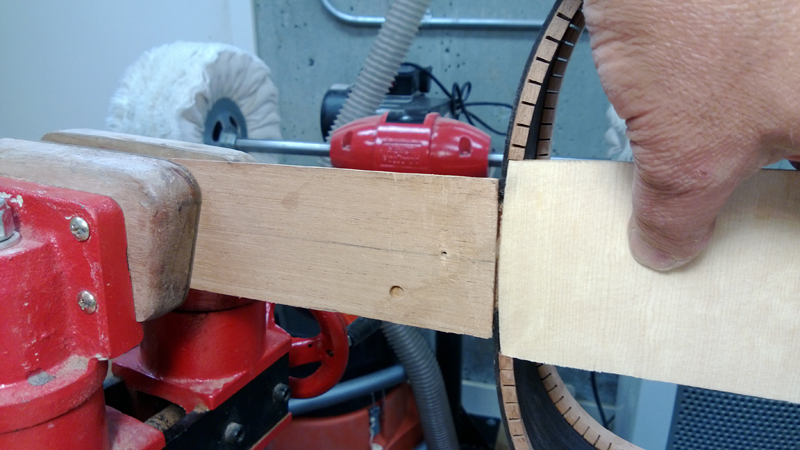
It takes a bit of care to profile the rims to work with the foot of the Spanish heel and an optional fret board patch. You can see in the following picture that there are three steps on the neck\rim assembly. The first step has to be exactly as deep relative to the edge of the rim\kerfed lining as the fret board patch is thick. The next step needs to be the depth of the top thickness so that when glued the top and the neck are level. Here is where I made a mistake. I thought I had everything properly profiled when I noticed that somehow a two inch portion of the top rim had a slight gap. I thought no problem, I carefully used a flat board to sand the rims down perfectly flat. Well given that I had glued the rims in the neck that left the top sitting too low relative to the neck. Whoopsy. Luckily I had only tacked the rims into the neck slots with super glue. I flooded the joints with super solvent and was able to remove the rims from the neck and properly reset them.


A classical guitar has a different neck\body geometry than a steel string. There are 2 reasons that I can tell for this difference. The first is that a classical guitar typically has the strings lower at the saddle position than a steel string guitar (10 mm vs. 14 mm.) Also, especial on the bass side, the classical guitar has a higher nominal action than a steel string guitar. For some easy to see calculation lets pick a 6 mm thick fret board with a 3 mm desired action at the 12th fret. One needs 2 x the action at the saddle (6 mm) plus a 6 mm thick fret board plus a 1 mm fret it is easy to see that with no angle on the neck I am already too high, 13 mm instead of 10 mm. So if one was using a straight edge on the neck without the fret board the straight edge would have to go inside of the body at the saddle for the correct angle. On the SS it is about 1.5 mm above the top at the same location.
Classical guitar builders use a variety\combination of methods to create the correct geometry: tilting the neck toward the top so that the nut end of the neck is a couple of mm higher than the plane of the body, or planning the angle into the fret board; both methods are often combined with a dome only on the lower bout.
I keep the neck flat to the body and plane the desired angle into the fret board and make a dome. If you look at the picture of my solera you can see that I can use it to create the flat neck angle and the dome. Looking at the straight edge in the picture, you can see that the straight edge is in the dome with a flat neck angle.

The neck angle in a classical with a Spanish heel is not fixed\set until the back is glued on. To close the box I will make sure the is top properly indexed in to my solera, I will first glue on the neck and rims on to the top. I also have index pins in the solera for the neck so I am sure that the top and neck are properly positioned as I clamp the rims to the top. I will have the neck clamped tight against the solera through this whole process. Leaving the body on the solera I will then clamp on the back. The solera keeps everything properly aligned while closing the box.
It takes a bit of care to profile the rims to work with the foot of the Spanish heel and an optional fret board patch. You can see in the following picture that there are three steps on the neck\rim assembly. The first step has to be exactly as deep relative to the edge of the rim\kerfed lining as the fret board patch is thick. The next step needs to be the depth of the top thickness so that when glued the top and the neck are level. Here is where I made a mistake. I thought I had everything properly profiled when I noticed that somehow a two inch portion of the top rim had a slight gap. I thought no problem, I carefully used a flat board to sand the rims down perfectly flat. Well given that I had glued the rims in the neck that left the top sitting too low relative to the neck. Whoopsy. Luckily I had only tacked the rims into the neck slots with super glue. I flooded the joints with super solvent and was able to remove the rims from the neck and properly reset them.


