A quick update. I attached the rims and neck to the top. So far all is well. I will probably put the back on tomorrow. Other than a label and a bit of clean up it is ready.
First used my flamenco.classical guitar peones for the the transverse braces.
I had thought to use a peones/kerfed lining hybrid installation method to attach the top. My thought was to take 3 piece segments of kerfed linings and treat them as a peones. Ultimately even the lower bout curve worked to lift the center segment. Oh well. I used the kerf cuts as guides and cut a complete set of peones or tentalones and installed them.
Tedious, but in the Zen of the moment one by one I glued on the peones.
Really in no time at all they were installed. I flipped the assembly off the work board and flush trimmed off the excess.
First Concert Ukulele
-
- Posts: 2746
- Joined: Fri Dec 23, 2011 8:33 pm
- Location: Seattle
- Contact:
-
- Posts: 2746
- Joined: Fri Dec 23, 2011 8:33 pm
- Location: Seattle
- Contact:
Re: First Concert Ukulele
In between football games and during the commercials yesterday I closed the ukulele up yesterday. Before closing I dealt with the label for the back.
I sanded the rims with a 25' radius disk. The profile was really close. I mostly needed to sand the neck heel down. I planed it close but looking at the sanding pattern I left the ebony high.
I installed the kerfed linings and not shown planed them down and cleaned them up with the radius
I got the idea for a tool to mark where the brace meet the linings after watching the video Building a Guitar from Scratch (with a pro luthier) Marshall Brune . The video was fun to watch but watching the producer of the video with a chisel was a horror show. I ground down and oddball knife I had so that it was as tall as my brace ends.
I used the marks to route into the linings
I had also marked where the braces pasted the rims. I drew a line a couple of mm in and cut those to length.
It all fit with a couple of minor adjustments so I glued the back on.
-
- Posts: 2799
- Joined: Mon Dec 19, 2011 4:19 pm
Re: First Concert Ukulele
The curl in that Tulipwood is amazing.
Hey I like the logo stamp you had made. What a cool touch for inside the instruments.
-
- Posts: 2746
- Joined: Fri Dec 23, 2011 8:33 pm
- Location: Seattle
- Contact:
Re: First Concert Ukulele
I found out I was wrong my Tulipwood is Canarywood another South American hardwood. I was suckered into the wood burning logo by a facebook ad. It was not very expensive. I just sent a logo drawing, I sized mine but they would have scaled as well. They got back to me what they were making and delivered it in a couple of weeks. I got it from https://brandingirons.com/Kevin in California wrote: ↑Tue Nov 02, 2021 4:40 pm The curl in that Tulipwood is amazing.
Hey I like the logo stamp you had made. What a cool touch for inside the instruments.
Re: First Concert Ukulele
Good looking John,
My branding iron came from here:
https://www.branding-irons.biz/
I am very happy with it.
Herman
My branding iron came from here:
https://www.branding-irons.biz/
I am very happy with it.
Herman
-
- Posts: 2746
- Joined: Fri Dec 23, 2011 8:33 pm
- Location: Seattle
- Contact:
Re: First Concert Ukulele
I now have the ukulele bound but there were some steps along the way to get there.
Working with a traditional build method having the neck aligned with the top is really easy. they are glued early in the process when one can see and align on a centerline.
Care still needs to be taken at the end of the instrument when the rims are glued to the top. Still with the traditional process it is done at a time where every thing is visible. It still felt good after the box was closed and the fretboard placed that it all still lined up
Before binding I rough carved the neck so that I could check out the heel profile. I mostly used a spoke shave and rasp to taper the neck and a bit of rough carving to blend it in with the heel.
I pulled out the side bender and bent 4 ebony binding strips. I got a whole bundle of binding cutoff for free from Gurian Instruments. It is nice to live nearby. I bent these with no water. Started bending around 230° finished and let cook for 10 minutes at 280°
I used a fleishman side binding machine with an LMI bit and bearing to cut the side channel. The binding are a bit tall for the ukulele so I will leave them about 1 mm proud. That depths works out perfect as my nylon strip and black purfling are about 1 mm taller than the shell I am installing.
Here is the plan
but I will glue it with the nylon strip instead of the shell.
What follows is the downside of a traditional build; all of the binding and purfling work neck the neck has to be done by hand. It is especially important to not nick the heel cheeks as they are visible.
I use the template to mark out the binding channel with a scalpel, cut the waste out using chisels. With the binding fitting I cut the purfling channel. I mark with a scalpel and clear with a chisel.
I clear from the top with a 2 mm chisel; I also use a wide chisel to mark out the continuation of the binding channel
Bit by bit I make the stack fit under the fretboard.
With all of that in place it was easy to just glue in the binding one side at a time.
While the one side was curing I flipped the ukulele over and started working on the back. Originally I cut inlets into the heel for the binding.
I decided I did not like how it went together. The back color was to close to the mahogany. The three strips of ebony just looked disjointed to me. Ok from the back, but bad from the side.
Ultimately I cut the heel back to the binding line and glued on a ebony button to tie it altogether.
While waiting on the second side binding strip I installed the abalone in the first side. I have bunches of little curved and straight segments that I break in one at a time and pushed down with a small hex wrench. Because of the natural pattern all the break marks are pretty well masked.
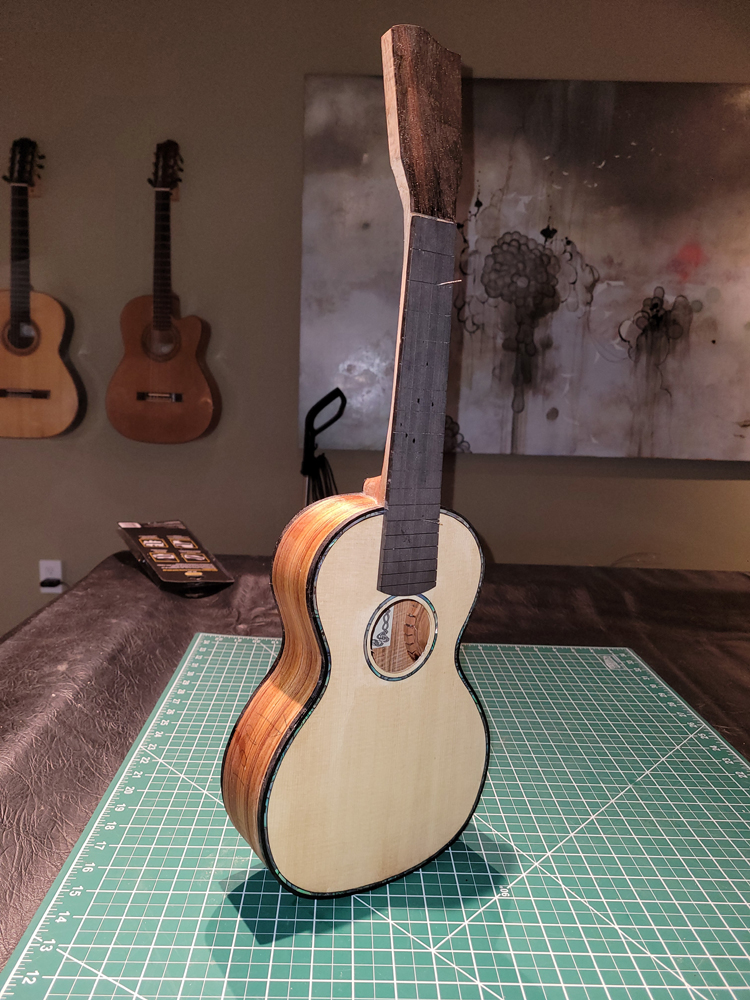
The fretboard is just sitting on the top I wanted to see how it looked.
The second side just after I installed and flooded with CA, before scraping flat. The pearl is flush with the top and the binding and purfling are proud.
After some scraping
Starting to look like a ukulele.
Working with a traditional build method having the neck aligned with the top is really easy. they are glued early in the process when one can see and align on a centerline.
Care still needs to be taken at the end of the instrument when the rims are glued to the top. Still with the traditional process it is done at a time where every thing is visible. It still felt good after the box was closed and the fretboard placed that it all still lined up
Before binding I rough carved the neck so that I could check out the heel profile. I mostly used a spoke shave and rasp to taper the neck and a bit of rough carving to blend it in with the heel.
I pulled out the side bender and bent 4 ebony binding strips. I got a whole bundle of binding cutoff for free from Gurian Instruments. It is nice to live nearby. I bent these with no water. Started bending around 230° finished and let cook for 10 minutes at 280°
I used a fleishman side binding machine with an LMI bit and bearing to cut the side channel. The binding are a bit tall for the ukulele so I will leave them about 1 mm proud. That depths works out perfect as my nylon strip and black purfling are about 1 mm taller than the shell I am installing.
Here is the plan
but I will glue it with the nylon strip instead of the shell.
What follows is the downside of a traditional build; all of the binding and purfling work neck the neck has to be done by hand. It is especially important to not nick the heel cheeks as they are visible.
I use the template to mark out the binding channel with a scalpel, cut the waste out using chisels. With the binding fitting I cut the purfling channel. I mark with a scalpel and clear with a chisel.
I clear from the top with a 2 mm chisel; I also use a wide chisel to mark out the continuation of the binding channel
Bit by bit I make the stack fit under the fretboard.
With all of that in place it was easy to just glue in the binding one side at a time.
While the one side was curing I flipped the ukulele over and started working on the back. Originally I cut inlets into the heel for the binding.
I decided I did not like how it went together. The back color was to close to the mahogany. The three strips of ebony just looked disjointed to me. Ok from the back, but bad from the side.
Ultimately I cut the heel back to the binding line and glued on a ebony button to tie it altogether.
While waiting on the second side binding strip I installed the abalone in the first side. I have bunches of little curved and straight segments that I break in one at a time and pushed down with a small hex wrench. Because of the natural pattern all the break marks are pretty well masked.
The fretboard is just sitting on the top I wanted to see how it looked.
The second side just after I installed and flooded with CA, before scraping flat. The pearl is flush with the top and the binding and purfling are proud.
After some scraping
Starting to look like a ukulele.
-
- Posts: 2746
- Joined: Fri Dec 23, 2011 8:33 pm
- Location: Seattle
- Contact:
Re: First Concert Ukulele
I glued on the fret board and made a classical style BRW ukulele bridge. It took me a couple of tries but ultimately I got it done (I have most of the slotting done but cut the wings too thin on the band saw.
Not much to say about gluing on the fret board, just a bunch of clamps. I previously had the fret board indexed with 1/32" drill bits. Drilling in the slots
I make the bridge by first making a blank that is at finished size. Drum sander and plane.
Then I use my micro mill to cut a series of 1/8" slots. 1 for the saddle, a slightly deeper one for the inside tie block (also to the starting thickness of the wings) and then I cut ledges for shell on the tie block edges. I install the shell so that I can trim it flush when I do two parallel cuts to the wind thickness on both edges of the tie block. These cuts can also be done with a table saw with a ultra thin blade.
Two slots as described above and glued in abalone
Cutting the ends of the tie block (the inside edges of the wings)
I milled a bit more than 1/4" of the wings so I could fit my band saw blade in the slot and cut away for the center (yes going to the inside and slipping when I hit the slot is how I goofed up the first one).
I used a plane to remove a bunch of the extra bulk on the wings
I used a rasp to shape the wings. Note that the bridge is fully supported on a support a little wider than the bridge. The extra width helps to leave a minimum thickness to the wings. Also if working on the edge, have the rasp move toward the center to keep from chipping the edge. (happened to a friend once).
Once rough shaped I used this handy narrow stewmac fret leveler as a sand paper rasp. It is good for the wings and the edge of the tie block.
Not shown, I used a chisel to slope the inside of the tie block BRW is so nice to plane it went fast.
In any case here is the result. Still needs a bit of sanding and I just threw in a saddle for the picture.