
Joining Plates 11/23/20
Joining book-matched soundboard plates or back pieces doesn't take a lot of pressure. It needs enough glue, evenly spread, and both plates jointed at the same time so if the edges produced aren't exactly 90 degrees to the faces, they will be complimentary angles and achieve the same result. I use Titebond and a variation of the technique Jonathan Kinkead shows in his book.
I like to join plates as thick as possible. These photos show inexpensive, AA grade cedar plates. They were unsanded and I used them at the thickness they came out of the packaging.
I taught in Public Schools for 18 years and never had big shop machines, just carpentry tools, as I could use the school's after hours. When I retired I wanted the tools I didn't have so bought a good cabinet saw and an 8” jointer. I joint both plates at the same time with a pass on the jointer, since I have it.
You can make a shooting board and utilize a jack plane with a well-sharpened plane iron for this. No light should show between them. Even better is a minute gap in the center and tight at the ends.
Kinkead uses nails to space the plates. I use straight pieces of red oak, clamped onto the plywood top of a cabinet on casters. Under where the plates will meet is a strip of wax paper. On top of this is a slat of oak 1/4” thick by about 1-1/2” wide (barely visible at far end in photo A). Set the spacing of the clamped-down side pieces at the width indicated when both plates are tented up on the center 1/4” thick strip.
This means your plate sides need to be close to parallel, sometimes remedied by tablesaw. In this case the one plate had a big side taper so I had to create two parallel planes for the side to brace against.
Pick up one plate, apply glue to the edge, carefully set it down against the other plate raised by the center strip. Cover with a second strip of wax paper. Pull the center strip out from under, lay something straight along the joint and weight it down. The railroad track is extreme overkill, it's just that I have it so I use it. Far less weight will keep the center down just fine.
Joining Plates
-
Will Reyer
- Posts: 141
- Joined: Fri Mar 15, 2013 5:03 pm
- Location: Marshall, MI
Joining Plates
- Attachments
-
- A.JPG (63.41 KiB) Viewed 8488 times
-
- B.JPG (66.63 KiB) Viewed 8488 times
-
- C.JPG (69.87 KiB) Viewed 8488 times
-
Dave Bagwill
- Posts: 5955
- Joined: Tue Dec 13, 2011 7:44 pm
Re: Joining Plates
That's almost my exact method as well. Ruined a sweet top once - only once! - by thinning the two halves before gluing.
-Under permanent construction
-
John Parchem
- Posts: 2783
- Joined: Fri Dec 23, 2011 8:33 pm
- Location: Seattle
- Contact:
Re: Joining Plates
Will, that is a clever way to join them.
Thanks for posting,
John
Thanks for posting,
John
Re: Joining Plates
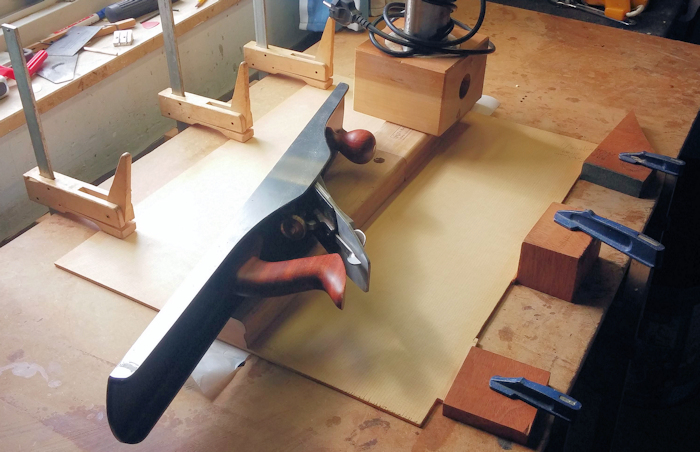
Well boys, here is my method. Cumpiano style.
One side clamped down, glue to the joint, second side against it, wedges between clamped blocks and the second side. weight to the top. Simple.
Never ruined a top. Ha!
stay safe
Herman
One side clamped down, glue to the joint, second side against it, wedges between clamped blocks and the second side. weight to the top. Simple.
Never ruined a top. Ha!
stay safe
Herman
-
Dave Bagwill
- Posts: 5955
- Joined: Tue Dec 13, 2011 7:44 pm
Re: Joining Plates
Actually, H - that IS the way I do it. Got it from Ken on the old forum. Ruined one top but not because of the method.
-Under permanent construction