
Side Bending; a simple inexpensive bending set-up
-
Greg Carter
- Posts: 4
- Joined: Tue Nov 06, 2012 7:58 pm
Side Bending; a simple inexpensive bending set-up
I just finished bending the sides of a Rosewood Guitar, and it turned out beautifully. (My first time!!) Your suggestions worked. I did soak the rosewood for about 8 hrs. and I kept it wet with a spray bottle while bending it. I discovered a new heating method that may not have been mentioned before. I took the 3" diameter aluminum pipe and flattened out one side, and mounted an aluminun plate with three 5/32 machine screws to that flat area of the pipe. I then managed to attach the assembly to a regular old clothing iron, then secured it in my vise, turned up the heat all the way - and - it worked!! One of my machinest friends at the Air Museum, where I work, managed to mount the whole assembly to a steam type iron with four of the 5/32 machine screws and it works even better. A simple inexpensive way to bend wood, and best of all! It works! Greg
Re: Side Bending; a simple inexpensive bending set-up
Congrats on the bending job Greg. If you have any photos of the setup, please feel free to share. We love pics!
Re: Side Bending; a simple inexpensive bending set-up
There is a method of bending by which the wood is actually boiled and then strapped to the form while still hot -- this is explained in both of Alfred Sloane's books.
And I know guys have used these to heat bending pipes:
And I know guys have used these to heat bending pipes:
ken cierp
http://www.kennethmichaelguitars.com/
Store Front
http://www.cncguitarproducts.com/
KMG Guitar Kit Information
http://www.kennethmichaelguitars.com/ki ... ckage.html
http://www.kennethmichaelguitars.com/
Store Front
http://www.cncguitarproducts.com/
KMG Guitar Kit Information
http://www.kennethmichaelguitars.com/ki ... ckage.html
-
Kevin in California
- Posts: 2716
- Joined: Mon Dec 19, 2011 4:19 pm
Re: Side Bending; a simple inexpensive bending set-up
"And I know guys have used these to heat bending pipes:"
Yep, that is how I made mine and it gets plenty hot, and, it's safe.
Kevin
Yep, that is how I made mine and it gets plenty hot, and, it's safe.
Kevin
Re: Side Bending; a simple inexpensive bending set-up
Thanks Kevin -- I started a seperate charcoal lighter heated bender thread with your pictures.
Greg --- pictures would be very helpful so we can get a clear understanding of your bending device Thank you in advance
Greg --- pictures would be very helpful so we can get a clear understanding of your bending device Thank you in advance
ken cierp
http://www.kennethmichaelguitars.com/
Store Front
http://www.cncguitarproducts.com/
KMG Guitar Kit Information
http://www.kennethmichaelguitars.com/ki ... ckage.html
http://www.kennethmichaelguitars.com/
Store Front
http://www.cncguitarproducts.com/
KMG Guitar Kit Information
http://www.kennethmichaelguitars.com/ki ... ckage.html
-
Ray Ussery
- Posts: 662
- Joined: Wed Dec 21, 2011 12:51 am
Re: Side Bending; a simple inexpensive bending set-up
Here's ANOTHER method of making and heating a bending pipe...U can use steel round pipe and cover it with aluminum sheet like Ken has shown....you can also put a threaded hole in the "Top"(end) of the large pipe and add an aluminum section (Bolt on) a 3" or 4" long piece OR? to bend binding or tight curves...notice there are vents in the tube top and bottom RT side... styled very much like units going for $180-$200...bending tubing or pipe into the teardrop shape is pretty hard to do w/o proper tools...I intend to use round tubing and weld in the end...but there are other ways to add the end like "Tabbing" flat stock and screwing it to the tube...on may even be able to replace the bulb thru the end (Top) with an overhead bulb grabber if the end is removable...worth looking at!
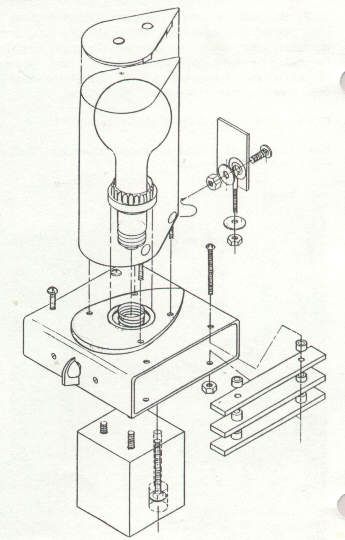
Bill of materials for making your own iron:
1. Bending pipe and steel sheet to cover top
2. Metal base/attached switch, power cord, and light socket
3. 6"x 6"x 1/4" heat insulating board (Duraboard)
4. 3"x 3"x 3-1/2" wood clamping block
5. 1/2"x 3/16" stove bolts (2)
6. Carriage bolts: 1/2"x 3/16" (4); 2-1/4"x 3/16" (4); 3-1/4"x 1/4" (4)
7. 1-1/2"x 3/16" eyebolts (4)
8. Nuts: 3/16" (12); 1/4" (4); 5/16" nut to be used as spacers (16). Washers: 3/16" (12)
9. Pointer knob
10. Wood strips for louvers (6)
Here we present a diagram for making your own iron. This is based on the bending iron kit we used to make and sell. It works very well, and is inexpensive. The simplest of materials are used: a 250 or 300 watt light bulb as the heat source, and a rheostat as the heat control and switch. More difficult to obtain is a section of pipe. (Aluminum boat mast would be ideal if it's available without the traveler channel) Otherwise, 4" seamless steel pipe (mechanical tubing) is good. If you like the tear-drop cross section, you can form the shape by jigging up with two hydraulic jacks and bar stock and stretching the iron. Or, the pipe can be squeezed in a lever but the results are somewhat unpredictable. There are asbestos substitutes - fiber-board like materials - that can be spaced between the iron and the wood (or metal) base. It is not necessary to cap the iron for heat retention, but it does help, and it is a good idea to secure the cap-piece well in case the iron is jarred and the bulb is broken. We have had a report of a bulb imploding, and the cap-piece provided protection. We have had ours in use for 5 or more years, with no imploding bulbs, but it's not unwise to be cautious.
Ray
PS: This is NOT my idea, I have not added a link but only the information because there is a conflict of interest in related Luthier items for sale :>)
NOTE: Ken was RIGHT....this is NOT a really workable idea...or at least it wasn't for me...it dosen't take much to pop the bulb...even touching it to the sides of the pipe will create a problem and it really didn't get hot enough to be practical IMHO...most I got with 150W was 240 degrees...soooo there ya go...don't waste your time on it and go with a tried and proven method like Ken said!
Last edited by Ray Ussery on Tue Dec 18, 2012 1:03 pm, edited 2 times in total.
Re: Side Bending; a simple inexpensive bending set-up
Ray -- I am thinking that idea is far from simple to construct. I can tell you that over the years I have never needed anything but a round tube and a thin metal backer (aluminum or stainless steel) so I just don't understand the wedge shape. Also note one tiny drip of water will cause that bulb to explode.
ken cierp
http://www.kennethmichaelguitars.com/
Store Front
http://www.cncguitarproducts.com/
KMG Guitar Kit Information
http://www.kennethmichaelguitars.com/ki ... ckage.html
http://www.kennethmichaelguitars.com/
Store Front
http://www.cncguitarproducts.com/
KMG Guitar Kit Information
http://www.kennethmichaelguitars.com/ki ... ckage.html