Florentine Cutaway
Re: Florentine Cutaway
You are doing outstanding work Herman. I really like the purfling miters at the cut away. I am impressed.
Re: Florentine Cutaway
Thanks Tony,
Kevin pushed me to start this thread, and now he wants me to show how I make the neck. Well fine, here's the followup:
The fingerboard and headstock get a lot of inlay. It would be a shame to do all that work and screw it up with the dovetail. That is why here the joint comes first.
The routing you saw above is a precise, but not a very interesting subject. So when that is done I start two things first. The angle toward the bridge. I aim, when the neck is flush with the body, for a little gap between the top and the straightedge (on top of the neck). About 1,5 mm.
so when that is too small, like on the picture, I take off some wood of the bottom end of the neckside.

Along with this procedure I want to have the neck be pointed at the middle of the top. if that is out of direction, I take a little wood of the side of the neck. At this point the sides of the neck are straight and parallel. So I can easily, with the straightedge on both sides of the neck, if all is centered.

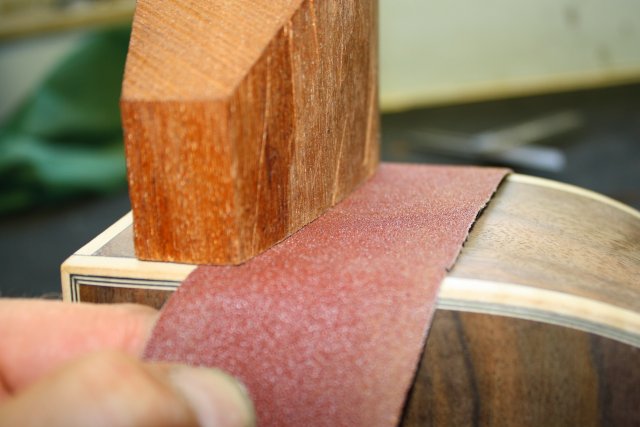
So when the neck is alligned to the center and with the right angle it just sits a little too high in the joint. Now there is time to make the neck sitting on the sides as flush as possible. therefor I ´sandscribe` the neck, sitting on the side. Sandpaper between the two and gently pull it out toward the heelend. This was the neck sands to the profile of the sides.

Go slow and use your eyes and you can make it almost immaculate.

When the angel, the centering and the side of the joint are right, the neck needs to be lowered into the body.
I use some chalk for this purpose. Put it on the dovetailside of the neck.

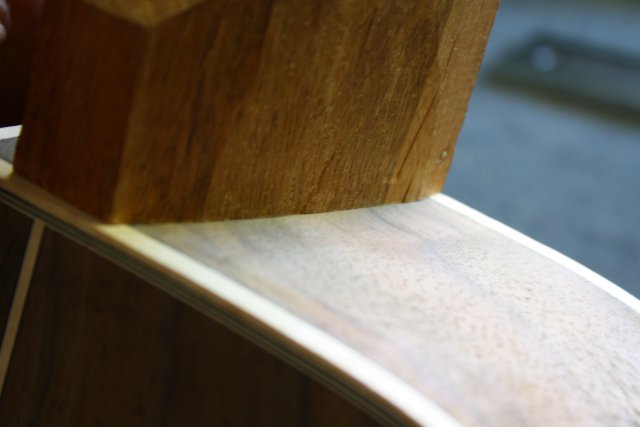
Push the neck firmly into the body and you can see where the high spots are. If you do this over and over, you will see that the joint get tighter and tighter.

Again take your time and take off some wood of the neckside until the neck is flat with the body. You do not want to go too far, ´cause then you need to glue on a veneer and start over. Not a big deal, but annoying.

And when all works out, there will be a dovetailjoint that is flush, tight, and right angled. Here the straightedge sits the aimed 1,5 mm above the top. Don´t be frightened, If I can,you can do it! I had some flaws before too you know, but here I am very happy.

Kevin pushed me to start this thread, and now he wants me to show how I make the neck. Well fine, here's the followup:
The fingerboard and headstock get a lot of inlay. It would be a shame to do all that work and screw it up with the dovetail. That is why here the joint comes first.
The routing you saw above is a precise, but not a very interesting subject. So when that is done I start two things first. The angle toward the bridge. I aim, when the neck is flush with the body, for a little gap between the top and the straightedge (on top of the neck). About 1,5 mm.
so when that is too small, like on the picture, I take off some wood of the bottom end of the neckside.

Along with this procedure I want to have the neck be pointed at the middle of the top. if that is out of direction, I take a little wood of the side of the neck. At this point the sides of the neck are straight and parallel. So I can easily, with the straightedge on both sides of the neck, if all is centered.

So when the neck is alligned to the center and with the right angle it just sits a little too high in the joint. Now there is time to make the neck sitting on the sides as flush as possible. therefor I ´sandscribe` the neck, sitting on the side. Sandpaper between the two and gently pull it out toward the heelend. This was the neck sands to the profile of the sides.

Go slow and use your eyes and you can make it almost immaculate.

When the angel, the centering and the side of the joint are right, the neck needs to be lowered into the body.
I use some chalk for this purpose. Put it on the dovetailside of the neck.

Push the neck firmly into the body and you can see where the high spots are. If you do this over and over, you will see that the joint get tighter and tighter.

Again take your time and take off some wood of the neckside until the neck is flat with the body. You do not want to go too far, ´cause then you need to glue on a veneer and start over. Not a big deal, but annoying.

And when all works out, there will be a dovetailjoint that is flush, tight, and right angled. Here the straightedge sits the aimed 1,5 mm above the top. Don´t be frightened, If I can,you can do it! I had some flaws before too you know, but here I am very happy.

Last edited by Herman on Sun Aug 17, 2014 9:16 am, edited 1 time in total.
Re: Florentine Cutaway
Berfore cutting the heel I draw the perimeter on the heelcap, and the curve of the heel to the side. then I roughcut the bulk off.
I follow the cumpiano-way. First the area of about 45 degree and working from there towards the headside and jointside. The edge,at this point I'll leave alone. Room for flaws along the road, you know.
The mahogany in front of the heel wiil become 16mm thick. At time moment I cut it to about 18 mm, for the same reason.


Then I draw the edge of the volute under the neck. I leave the top of it untouched till the end. When the neck is ready, I look how high it should be. Aesthetics as important as strength to me.

First I chisel the bulk off. Here also I leave 2 mm extra wood for later.

Looks messy now. Hu? this will be a neck? Yes!, in the end we will be alright.

I follow the cumpiano-way. First the area of about 45 degree and working from there towards the headside and jointside. The edge,at this point I'll leave alone. Room for flaws along the road, you know.
The mahogany in front of the heel wiil become 16mm thick. At time moment I cut it to about 18 mm, for the same reason.


Then I draw the edge of the volute under the neck. I leave the top of it untouched till the end. When the neck is ready, I look how high it should be. Aesthetics as important as strength to me.

First I chisel the bulk off. Here also I leave 2 mm extra wood for later.

Looks messy now. Hu? this will be a neck? Yes!, in the end we will be alright.

-
John Parchem
- Posts: 2750
- Joined: Fri Dec 23, 2011 8:33 pm
- Location: Seattle
- Contact:
Re: Florentine Cutaway
Herman,
This build thread is excellent! You pictures and description are really clear. I love the details you are showing on how to set the dovetail and carve the neck.
This build thread is excellent! You pictures and description are really clear. I love the details you are showing on how to set the dovetail and carve the neck.
Re: Florentine Cutaway
Herman;I'm with JohnP. This could have easily been a book in progress. Your work is impeccable. Ha me? I just start whitteling,cutting off everything that don't look like a guitar neck. You could probably make two that look exactly the same. Mine would all be different in one way or another.
Re: Florentine Cutaway
Glad you like it, my friends. And good my entangled writing make any sense. You know, what is very clear to me does not have to be that to you.
I do not have any mold for the neckprofile. I just use my eyes, hands and a little ruler for the staight parts of the neck.
Therefore none of my necks are exactly the same. Don't misunderstand, they are not randomly made. They have a determined thickness and width. And certainly have a C, D or flattened profile. But in the end it is a "hand"job for me. (No jokes please!)
So Lonnie go for it! After 10 necks or so you get a "routine" in this job.(Again, no jokes. Ok, maybe one)
Re: Florentine Cutaway
Ok Herman no jokes. Still think it would make a nice book. I'd buy a copy for sure.
