Osage orange falcate classical.

Show us how your current project is progressing
John Parchem
Posts: 2678
Joined: Fri Dec 23, 2011 8:33 pm
Location: Seattle
Contact:

Re: Osage orange falcate classical.

Post by John Parchem » Wed Feb 07, 2018 12:26 pm

Tim Benware wrote:John, would you say this bracing pattern has some similarities to the new Taylor "V" bracing design?
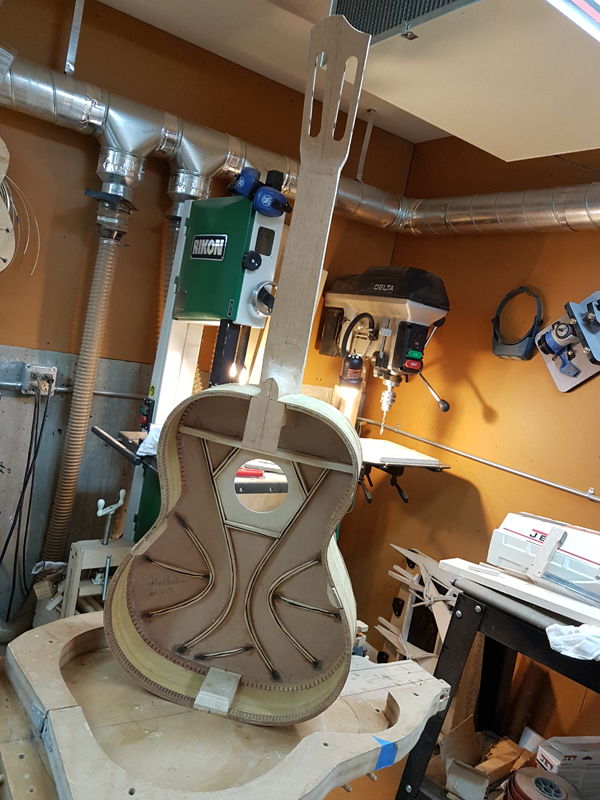
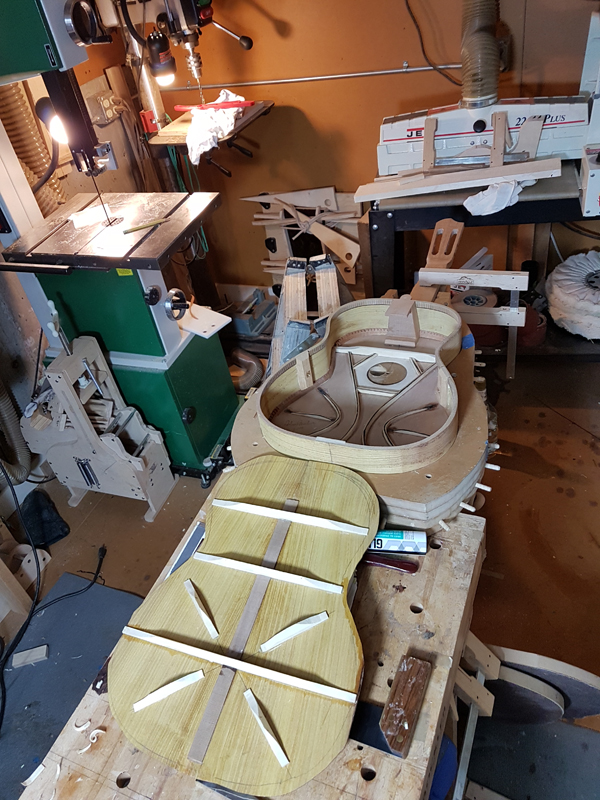
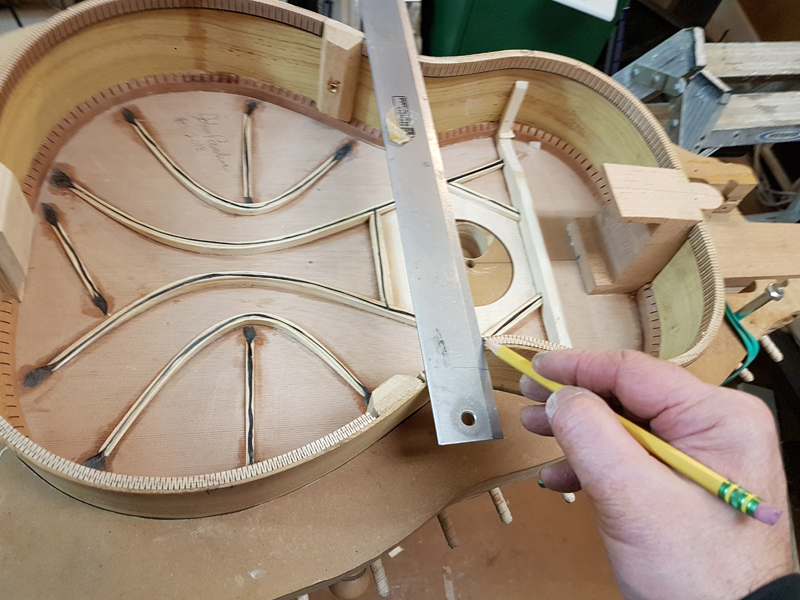
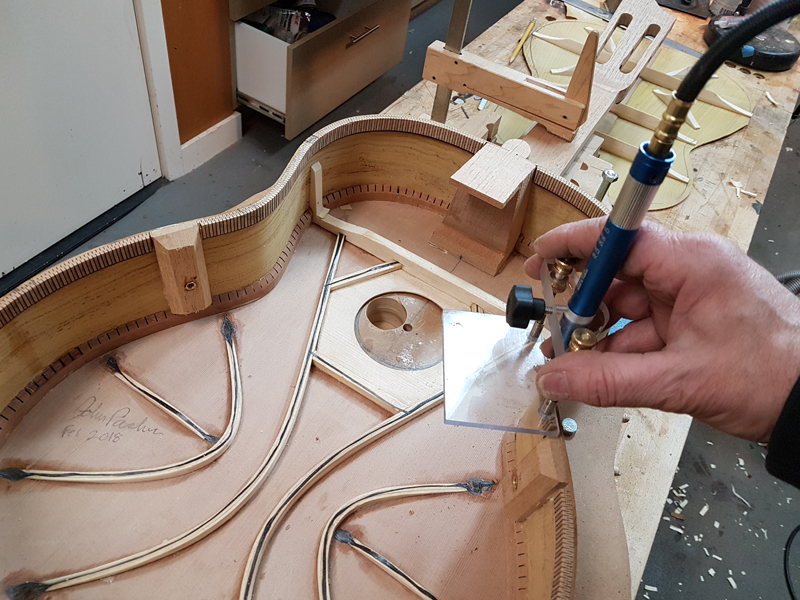
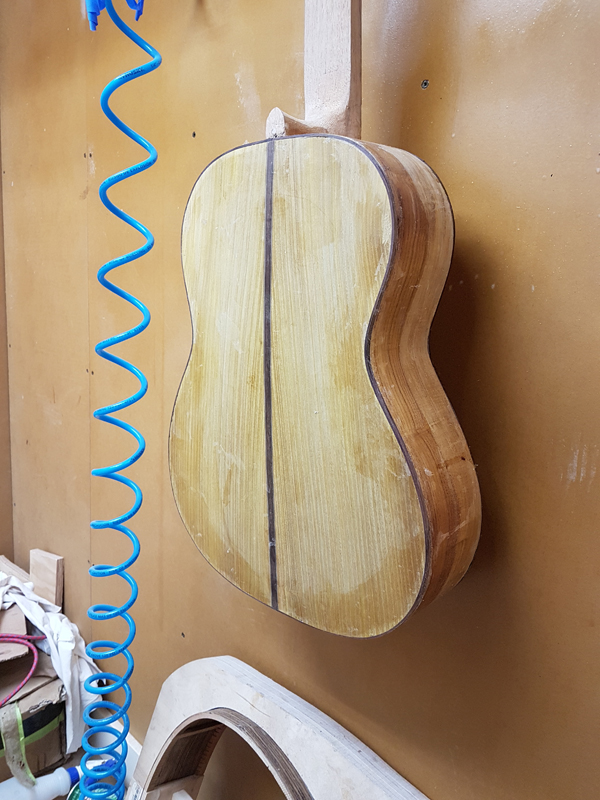
I think the one similarity is that it removes the cross of the X brace. Right at the cross of an X brace the contribution to stiffness to the pair of braces to the top halves; basically creating a discontinuity, not a bad thing but I think it can be heard in how the top responds. Having said that I think the falcate patten is more like an X brace pattern with the cross removed. Both the X braces and the pair of falcate braces terminate high in the upper bout and do not use a lower transverse brace to carry the string load. I make both X brace and falcate braced SS guitar. There are some who like the clean sound, a clarity in all of the notes played across the string, I get from the falcate and there are others who like the more complex response from the X brace. Also all of my falcate instruments sustain forever. Yet they are all loud guitars. One bit of feedback I got from my classical guitar instructor is my falcate SS sounds and responded like a powerful classical guitar. He had me build a falcate classical guitar after playing my falcate steel string; after more than a year it is still his primary guitar.

I wrote all of that about the classical because I see that the V brace, like most classical guitars, relies on a pretty stout lower transverse brace for structural reasons. So to me the V brace bracing pattern more closely resembles a classical fan brace design. So when the V brace market talks about more even intonation (does not make a lot of sense) they may really be hearing the clarity of removing the structural discontinuity at the cross of the major braces.

So those who like the X brace sound may not be happy with the Taylor. Probably not a Bluegrass guitar. Could be a good finger picker guitar.

John Parchem
Posts: 2678
Joined: Fri Dec 23, 2011 8:33 pm
Location: Seattle
Contact:

Re: Osage orange falcate classical.

Post by John Parchem » Sun Feb 11, 2018 12:37 pm

I have the guitar closed. I need to put it up for today and prepare the shop for a plate joining demonstration I am giving to the the Seattle Luthiers Group. Here is how I got there -

When I installed the tops reversed kerfed linings I left the space for the tops upper transverse bar. So with the rims complete I started to prepare for gluing on the top. I was careful when I install the linings but I did go around with a plane to make sure the linings matched the all ready profiled top. I had a minimal amount of work as I have been working on the solera the entire time. I cleaned up some of the CF tails off the braces so they would not fall under the linings. Also most importantly I made sure I knew where a straight neck lined up with the solera. When I work on a solaria the side to side angle is set when I glue on the top the tilt angle of the neck is set when I glue on the back. Setting the neck angle working on a solera with a spanish neck is much simpler than a bolt on or a dovetail neck. With the slots in the neck heel block you start with a perfect joint to the rims. Then you just need to position the neck when gluing on first the top and then the back. I will have more when I glue on the back.

Checking the neck alignment.

Image

Everything ready to glue the rims and the neck to the top. Unfortunately I did not take of the actual glue up but imagine the following picture and lots of cam clamps.

Image

After the glue up

Image

Image

To clean up and installation of the kerfed linings and most important prepare to set the neck angle I put the body back on the solera with the neck clamped in the correct position. My solera has the neck angle planed in, so with the body in the solera and the neck clamped to the solera the front on the guitar top and neck are held in the correct position. With this position I cleaned up the linings and the spanish foot on the heel with my back radius disk (I use a 10' but 15' is more common.) When I have completed profiling the back the rims and the spanish heel will all be on the same sphere section ready for the back.

Image

With the body ready for the back I braced the back. The pattern I use is for a live back from the plans included in the Gore/Gilet Build volume. I start by laying out the back braces using the previously profiled back stock. They are profiled to the gabled house shape.

Image

Image

Image

Image

As mentioned above I use a 10' radius. The 10' radius when making an active back allow one to gain back some stiffness after thinning the plate to reduce mass. It does help and of course there are limits. The 10' radius is quite a curve especially when gluing down the linings. You will see in the picture how much of the longer brace needs to be removed to apply the radius.

I start out by first drawing on the radius to the bottom of the brace. I plane the brace to the line and clean it up by sanding in my radius stick.

Image

Image

Image

Image

I usually use my vacuum box to glue to glue on the back braces but I have had problem with the severe radius. This time I used my gobar deck stealing an idea I think I saw on The Luthier Community forum. I made a bunch of gluing culls using scrap from my profiled back braces. Basically gluing two together at their base provides a perfect shape for the profiled braces.

Image

The bracing pattern includes radial braces as well. I used two glue ups as there are only some many gobars that I can deal with before I start popping them out.

Image

Image

I profile all of the braces to 2 mm on the ends. To make this really easy I have a 2 mm template that I use to both protect the back and to know when to stop. With the template in place it takes well less than a minute to profile each brace.

Image

Image

Image

With the back positioned I used a scalpel to tightly mark where the braces come through. A straight edge to connect the scalpel marks. I use a pencil mill grinder to route out rebates for the brace ends in the linings.

Image

Image

Image

With the back fitted, I rechecked the backs alignment. Not shown but I pulled the body out of the mold to make sure the back joint reinforcement strip would not end up under the heel slipper. With everything good I glued on the back.

Image

Image

Image

John Parchem
Posts: 2678
Joined: Fri Dec 23, 2011 8:33 pm
Location: Seattle
Contact:

Re: Osage orange falcate classical.

Post by John Parchem » Tue Apr 17, 2018 11:03 am

I never really like binding especially on a classical guitar with the neck in the way of the router requiring a bunch of hand work. I finally decided on a simple binding scheme. Narrow rosewood bindings with a black and white (maple) rope purfling for the top.

Image

I taped all of them together and bent them in my fox side bender

Image

The first route with my Fleishman Binding Machine (not shown) was for the binding. I did not route the full depth of the binding as I wanted narrower bindings. So I install them about 1/3 proud and used a plane and a scraper to take them down. After routing for all of the bindings I routed for the purfling on top.

As mentioned above the hardest issue is the handwork around the neck heel in the back and the neck on the top. I used my classical template to get a line for the binding following the existing route.

Image

I marked the line with a scalpel cutting quite deep and then cleared the area with a razor saw and a 2 mm chisel.
Image

Image


On this guitar I did not cut a channel for the end graph until after I routed the binding channels, I usually do it before I close the box but did not in this case. I just use a scalpel to mark a razor saw to cut the rest of the way and a chisel to clear. The end graph matches the back strip Brazilian rosewood and black - pear - black violin purflings.

Image

There is a bit of hand work on the top as well but you only need to cleanly get under the fretboard. I used a scalpel, a razor saw and a chisel as shown above for the back.

After that it is just a matter of installing all of the bindings and purflings with LMI instrument glue and leveling them.

Image

Image

Note on the back a use a scarf joint to join the two bindings. I cut the two scarf cuts such that they make a pocket for their mate. I glue one binding and then the second That way I can apply some force into the joint to get a tight joint.

Image

Image

I used a block plane and scraper to level the top and the back.

Image

Image

Image

John Parchem
Posts: 2678
Joined: Fri Dec 23, 2011 8:33 pm
Location: Seattle
Contact:

Re: Osage orange falcate classical.

Post by John Parchem » Wed Apr 25, 2018 1:45 pm

I have this guitar ready for finish prep.

First off I had to carve the neck. I started with a classical neck template and drew out the first and 9th fret profiles on graph paper. I then drew the uncarved profile of my neck tapered but still a squared off profile. This allows me to figure out where to layout the facet profiles on my uncarved neck. The layout line gives me a consistent facet with the face tangent (plus a bit) to the neck curve.

Image

I take as much off with a spokeshave as I can to get a plane like facet, and finish up the areas near the heel and the headstock with a rasp.

Image

Image

Image

Some who do this method also draw out secondary and maybe even tertiary facet lines. I instead eyeball the next sets of facets and use the spokeshave and rasp fitting against the template to profile the neck.

Image

I clean up the profile using cutoffs from my belt sanding paper. It has a very strong backing allow me to use it without the paper ripping. I use it long ways instead of shoeshine as I want smooth long lines without wavers and tips.

Still barefoot
Image

Not shown as I got in the groove and stopped snapping photos, I used mostly a chisel to finish the heel profile and the neck to head stock transition.

I glued on the fretboard and cleaned it up a bit, now it is ready for finish prep.

Image

Image

Image

Image

Image

Image

Daniel P
Posts: 519
Joined: Tue May 14, 2013 11:00 am
Location: the great Pacific NW

Re: Osage orange falcate classical.

Post by Daniel P » Wed Apr 25, 2018 3:10 pm

I love the binding contrast with the Osage back and sides. Another beautiful build.

Kevin in California
Posts: 2716
Joined: Mon Dec 19, 2011 4:19 pm

Re: Osage orange falcate classical.

Post by Kevin in California » Thu Apr 26, 2018 12:37 pm

Looks great John.
I have a set of Osage I've had for about 8 years trying to decide how to use it. I think a classical would be a great use since I've read that the tone you get rivals that of BR.
I know you not using traditional bracing, but it will still be great to hear it when done.

Kevin

John Parchem
Posts: 2678
Joined: Fri Dec 23, 2011 8:33 pm
Location: Seattle
Contact:

Re: Osage orange falcate classical.

Post by John Parchem » Tue May 01, 2018 6:30 pm

Thanks guys.

This mostly duplicates what I put in the finishing section but I also wanted it in the guitar blog.

I am surprised that I am really liking how the Osage Orange looks. Also I am told that it darkens with age. I started to pore fill the guitar today using products John Greven a luthier in Portland recomended. The epoxy he uses is System 3 SilverTip Epoxy with the fast hardener. He liked it because it was clear, it goes on easily is made to work on bare wood and wets the wood well. This is mostly a boat building epoxy. The other item he recommended was getting a box of blank credit cards to use as a scraper.
White Blank PVC Plastic Cards. I got 100 for less than $13 at amazon https://www.amazon.com/gp/product/B007M413BC.

Image

I applied a little at a time and used the card to apply and then squeegee most of it off. With the fast hardener I will sand most of it off this afternoon and reapply. I always use the first application of epoxy to find areas that need more prep because it shows up flaws just like a finish.

Image

Post Reply